It seems like there is always another project
when one moves into a new house.
We have been working on our home,
one room at a time.
The office has been the object of our attention
for the past couple of months.
It was first painted to match the living area,
then beadboard was added to the space.
This project was relatively quick and made a big difference in the feel of the room.
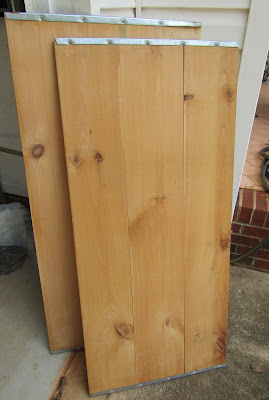
Sister had left these boards here, knowing we could do something with them.
She was right.
As soon as I saw them, I knew they could be repurposed into a table top for our computer.
I like the natural elements of the wood and steel together.
A work space was set up out on the driveway and I got to it.
Knowing that I wanted to do some kind of finish,
a good sanding was in order,
making sure to go with the grain.
After sanding, I simply wiped down the boards,
to eliminate any leftover dust.
Within 10 minutes, I had both boards completed.
The grain of the wood was too sweet to cover,
so I decided to white wash the boards instead.
I used some leftover interior white paint,
and mixed it half-and-half with water.
A small paintbrush was used to apply it,
again, being sure to work with the grain.
As I applied the paint, I periodically wiped it off with a rag.
This step was necessary to make sure that the paint wasn't covering the wood too much.
The paint dried fairly quickly, so it was imperative to work in a small area at a time.
After applying one coat,
I decided I wanted it a bit darker,
so I used an additional coat of the same ratio of white wash.
If you know from the outset how dark you want it,
you could add less water to your paint before beginning the project to make it darker.
Since this is the first time I've ever white washed,
it was best to err on the side of caution.
I'm glad I did.
The second coat was exactly what I was looking for.
I then used a water-based sealer to give it a glossy sheen.
Big K went to pick up what we needed for the legs.
He found all of the materials in the hardware department.
These pieces were screwed in to the underside of the board.
Buying the correct depth screw is important,
so that they don't come up through the top of the wood.
He bought several galvanized pipes from the plumbing department,
and had the store cut them to the proper length.
We found plastic feet with cork bottoms to ensure the floor stays scratch-free.
It's made a fabulous work space.
Everything we need fits on the desk
and the tower for the computer tucks nicely underneath.
We're really happy with the way the finish turned out.
You can be sure white washing will be repeated.
I'm already thinking about doing some picture frames.
These curtains really helped bring the room together.
It was one long panel that I split in two,
and they fit the window perfectly.
The simple pattern keeps the desired sleek look in mind.
It's a bit more streamlined than before,
which is exactly what we were going for.
Our final alteration to this room
is to find a simple eating table,
as the one we have is a bit too bulky for the space.
A few more pictures on the wall,
and this room will be complete!
We've had to adapt to this smaller
but it feels good knowing that we can make it work using what we have.
New House Series:
Moving Toward Bliss
A Fresh Look
Under the Spell of IKEA
Fan-Tastic!
Closet Project
Bad to the Bone Beadboard
What projects are you working on?


No comments:
Post a Comment
Thanks for taking the time to leave your thoughts!